AutoCAD's 2027 built-in CONVTOSOLID command converts polyface meshes to 3D solids - but only when the mesh is already perfectly watertight. Most real-world mesh objects imported from STL, OBJ, SKP, or other formats contain holes, gaps, or non-manifold edges that cause CONVTOSOLID to fail silently.
Automesher Application adds the AmConvertMesh command, which includes automatic hole filling before conversion - handling the mesh repair that prevents standard AutoCAD from completing the conversion. This guide shows how to convert mesh to solid in AutoCAD 2027 in six steps, including the Fill Holes option that makes the difference between a successful conversion and a failed one.
How to Convert Mesh to Solid in AutoCAD: Step-by-Step
📥 Install Automesher Application
Download and install Automesher Application for your CAD platform. After installation, restart AutoCAD to autoload the plugin. Automesher adds the AmConvertMesh command and a dedicated ribbon tab to your AutoCAD environment.
⚡ Restart AutoCAD
After installation, restart AutoCAD (or BricsCAD, ZWCAD, or GstarCAD) to load the Automesher plugin. Confirm it has loaded correctly by typing AmConvertMesh in the command line - the command should be recognized.
🚀 Run AmConvertMesh
Type AmConvertMesh in the AutoCAD command line and press Enter, or click Convert Mesh in the Automesher ribbon. The command is ready to accept your mesh selection.
🔍 Select the Mesh
Click the polyface or polygon mesh object in the drawing that you want to convert to a solid. Use standard AutoCAD selection methods - click to select individual objects, or use a window/crossing selection for multiple meshes. Press Enter to confirm the selection and open the conversion dialog.
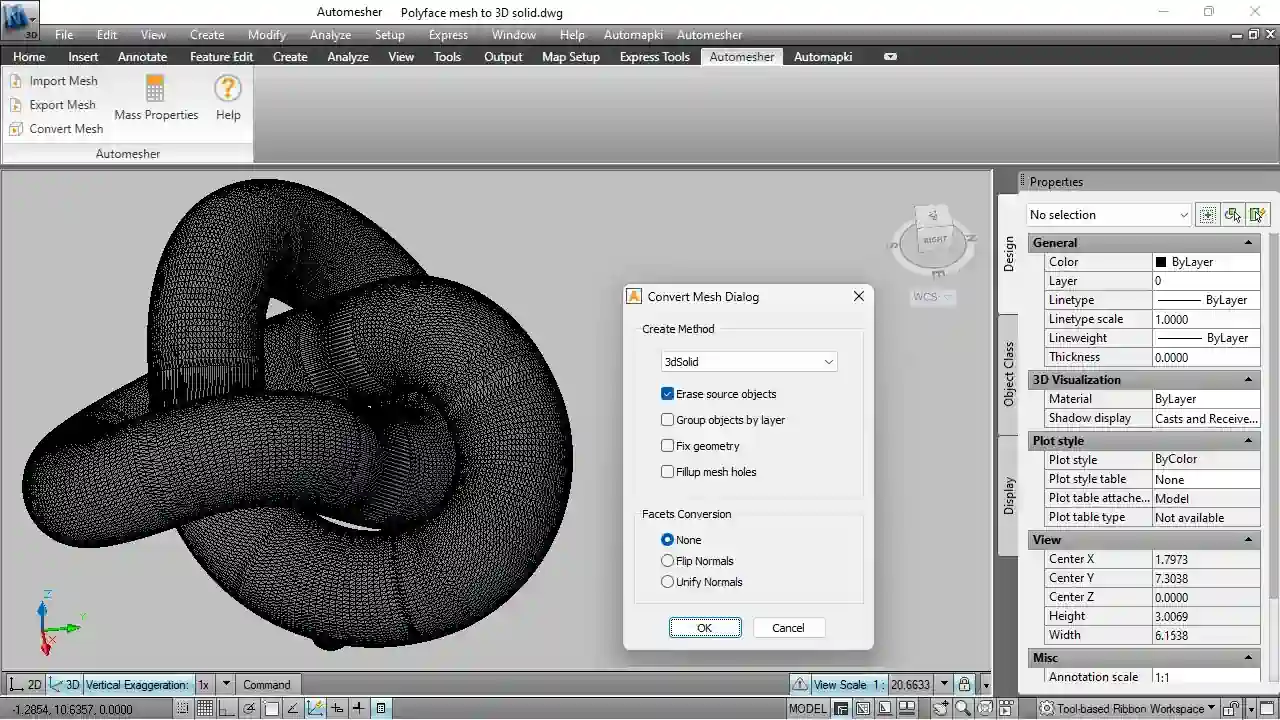
✅ Enable Fill Holes and Set Conversion Options
In the AmConvertMesh dialog, configure the following settings:
- Convert to 3dSolid - produces an ACIS-based 3D solid body that supports Boolean operations, section planes, and MASSPROP analysis
- Fill Holes - automatically detects and patches open boundaries in the mesh, closing gaps and holes to make the surface watertight before conversion. Enable this for any imported mesh that isn't already perfectly closed.
- Fix Geometry - repairs non-manifold edges, degenerate faces, and winding order errors in addition to hole filling. Enables this alongside Fill Holes for best results with real-world mesh data.
- Erase Source Entities - removes the original polyface mesh after the solid is created, avoiding duplicate geometry in the same location
Click OK to run the conversion. Automesher repairs the mesh and generates the 3D solid.
🔄 Verify the Converted Solid
After conversion, verify the result using the MASSPROP command - run it on the new solid and confirm it returns non-zero volume and centroid values. A valid watertight solid produces mass property data; a failed conversion or unclosed shell does not.
The solid is now ready for Boolean operations (UNION, SUBTRACT, INTERSECT), section planes, dimensioning, or export to STEP or SAT for use in other CAD systems.
Frequently Asked Questions
-
Why does CONVTOSOLID fail on my mesh?
AutoCAD's built-in CONVTOSOLID requires a perfectly watertight, manifold mesh. Any open boundary or non-manifold edge causes it to fail. The AmConvertMesh command with Fill Holes enabled repairs these issues automatically before attempting the conversion.
-
What is the difference between AmConvertMesh and CONVTOSOLID?
CONVTOSOLID is AutoCAD's native command - it converts clean, watertight meshes but has no mesh repair capability. AmConvertMesh from Automesher adds automatic Fill Holes and Fix Geometry repair before conversion, making it practical for real-world imported mesh data that CONVTOSOLID can't handle.
-
How do I verify the converted solid is valid?
Run the MASSPROP command on the converted object. A valid 3D solid returns non-zero volume, surface area, centroid, and moments of inertia. If MASSPROP returns no data or zero volume, the conversion produced an unclosed shell
-
Is there a free trial?
Yes. The free evaluation version of Automesher Application supports up to 20 mesh conversions. The full licensed version provides unlimited conversions.
Summary
Converting mesh to solid in AutoCAD requires a watertight mesh - the Fill Holes and Fix Geometry options in AmConvertMesh handle the repair that prevents AutoCAD's native CONVTOSOLID from completing. Automesher handles the full six-step workflow in AutoCAD, BricsCAD, ZWCAD, and GstarCAD. Verify the result with MASSPROP - a valid solid returns volume and centroid data.
👉 Ready to convert? Download Automesher Application and try it free for up to 20 conversions.